The art of sacrifice
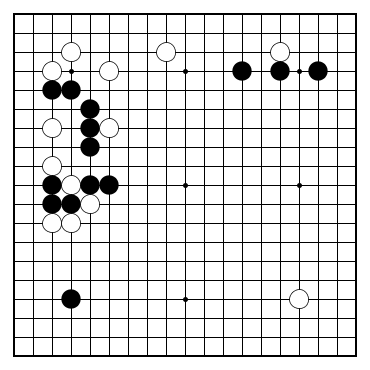
The position in Dia. 1 occured in a game I was watching on IGS. Black has just played atari on the middle of the left side - where should White play next?
 Dia. 1
The obvious move for White is to connect his stone in atari: Black only has 2 liberties, so it doesn't look like he can do anything.
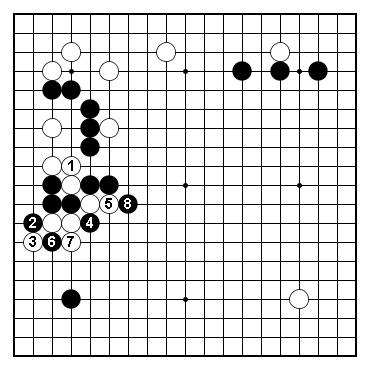
But Black's stones are more resourceful than they look like: Dia. 2 shows a common trick Black can use for this occasion to setup a ladder: the 2-3 exchange is essential, and all moves that follow are forced if White persists in trying to capture Black's stones, since each Black move is an atari. After Black 8, though, White is at a loss.
 Dia. 2
Following from Dia. 2, in Dia. 3 we see why White cannot capture Black: this works for Black because the ladder after 12 is favorable for him.
 Dia. 3
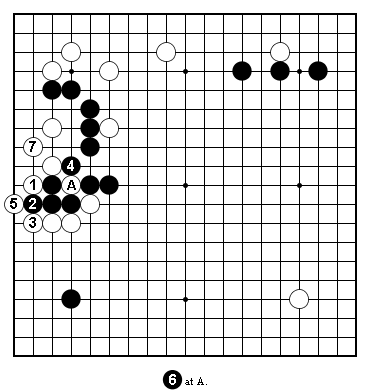
See Dia. 4 for what White (Ishida Atsushi 9p) played in the actual game: he sacrificed his stone in atari and connected underneath in very nice shape.
Black has to capture with 4 - see next diagram for the reason why. A common error to avoid is for White to play at 5 instead of 3, for an "easier" (as in "less things to read") connection - but Black would push at 3 first, which results in an extra cutting point in White's shape in the end.
 Dia. 4
If Black descends in Dia. 5 to prevent White's connection on the first line, all his stones will die: he is left with 3 liberties while all of White's groups have more than that.
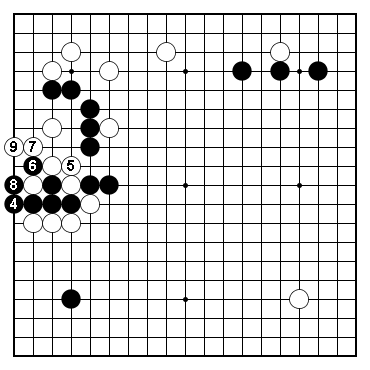 Dia. 5
Conclusion
Don't respond to atari automatically - many times the opponent has a hidden plan. In this article, sacrifices occurred more than once: Black 6 in Dia. 2, and White 1 in Dia. 4 - both are examples of sacrifice tesuji.
Make sure to understand Black's tactics to force his way out when surrounded in Dia. 2 and Dia. 3 - this kind of sequence really occurs a lot in one shape or another. It is just like a samurai surrounded by enemies, and fighting his way out in the last moment.
