Sometimes It's Better Not to Know Joseki
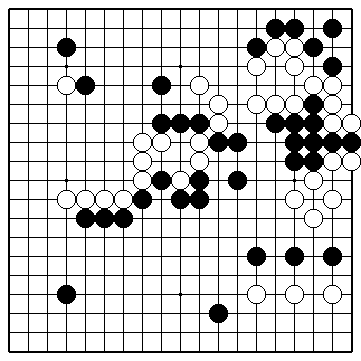
White to play next in dia 1.
Try to think of at least 2 alternative approaches, each with several follow-up moves.
 Dia 1
Dia 1
Dia 2 gives a bit of background about the position. I am White in this game from the insei league. My opponent has just played the triangle-marked contact move in the upper left, to prevent White's attack with A.
White would like very much to get to play first on the lower side, at B, to prevent Black from making a huge territory on the lower side. B also creates some possibility for White to isolate the 3 Black stones next to the lower right corner.
During the actual game I only considered the book follow-up moves for White in the upper-left: C and D. Visualising several of the normal continuations from each, nothing looked too promising for White. That is what I mean by "it is better not to know joseki": you get a lot of blind spots since your brain tends to ignore any non-standard move.
 Dia 2
Dia 2
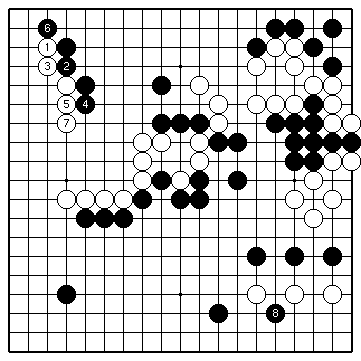
White 1 in dia 3 is one of the 2 standard variations that I considered, and this is what I played in the game. White lost the initiative, and Black got to play first in the lower right, at 8.
White has already lost.
 Dia 3
Dia 3
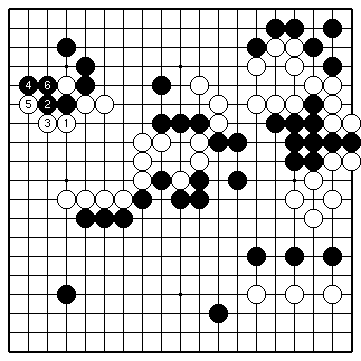
In dia 4 we see the other standard variation.
After Black 2, White usually connects with A or B.
 Dia 4
Dia 4
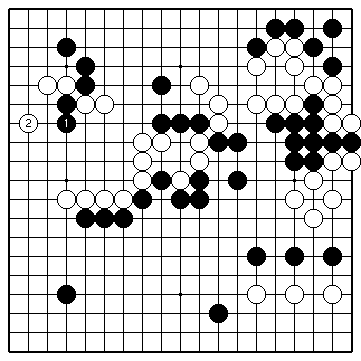
There is actually a third possibility, which is to extend to White 1 in dia 5.
 Dia 5
Dia 5
Dia 6 shows the standard follow-up. This is usually labeled as "for special occasions", which means that White sacrifices the stone in the corner to build a wall on the outside. Of course, it doesn't make any sense for White to give away even more territory in the corner, and build a wall next to his existing one.
Instead of of playing the standard White 1 in dia 6, though, White has to be creative. Last chance to test your creativity now - before I spoil it and show the answer in the next diagram.
 Dia 6
Dia 6
One of the 3 official insei instructors, Tei Meiko 9 dan, showed me that White can play 1 in dia 7.
If you look at this move from a fighting perspective, it makes perfect sense: "extend from a cut", says a proverb.
It is very important to look at each position as a unique fight, not as a joseki. My mistake here was to regard the situation in the upper-left as a joseki, so I only considered the standard follow-ups that I knew about.
 Dia 7
Dia 7
If Black descends with 1 in dia 8, White makes eye shape in the corner with 4 and 8 - a combination to remember. Black has to defend with 7 against White A, but then White can attack severely with B.
This position doesn't look good at all for Black - suddenly White's wall came to life, and Black has weak groups.
 Dia 8
Dia 8
Black should actually extend with 1 in dia 9 - this is the locally correct move - but in this case it doesn't make much of a difference. Black is still floating in the middle of White's influence.
 Dia 9
Dia 9
