"Do you think this exchange is good for you?"
This article is based on a commentary by Cho Seokbin (ex-insei in Korea, currently one of the top players in Europe) on the game that decided the final result in the Cherry Blossom Go Tournament 2007 in Seattle (between myself and Steve Stringfellow 6d AGA, who plays White in this game). It highlights a few of the most interesting points of the game, as resulted from Seokbin's commentary.
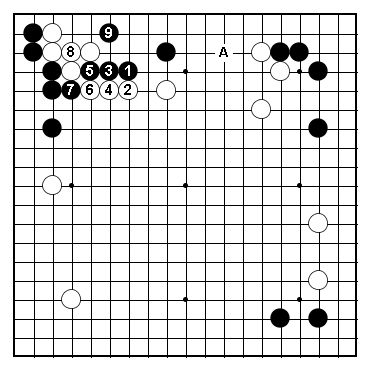
Diagram 1 is the reason why I was reluctant to play kosumi-tsuke in the upper-left corner against the White kakari - because I wasn't sure what should Black do if White plays boshi on the upper side, resulting in this position.
Actually this is a good position to turn into a problem: Black to play in diagram 1.
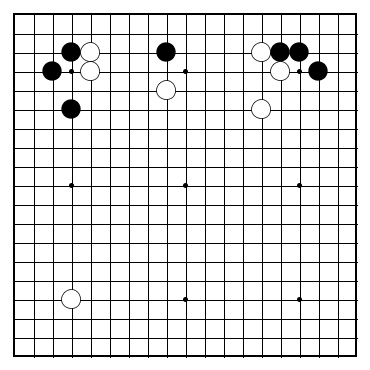 Dia. 1
The answer is really simple, the "back to the fundamentals" type of approach: make a base on the upper side, that's all Black needs to think about. The result in diagram 2 is very good for Black, becase he already has territory in 3 places, while White doesn't have anything. The order of play is important: first extend on the left, to aim at the gap between white's stones in that area, and prevent the two leftmost White stones from making any sort of base on the upper side.
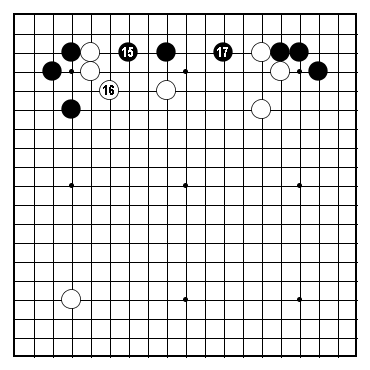 Dia. 2
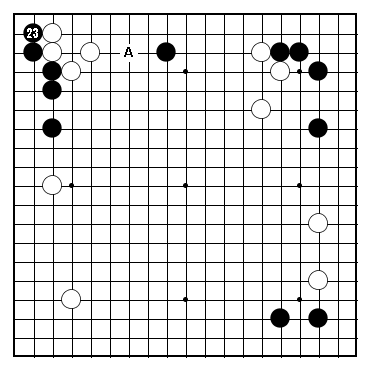
The next interesting commentary was about move 23: in the game Black (myself) played as in diagram 3, with the purpose of making eyes for the upper left Black group, while taking White's eyes away.
This move doesn't pass the "is this exchange good for me?" test, though: White will most likely respond at A, which hurts the lonely Black stone on the upper side.
 Dia. 3
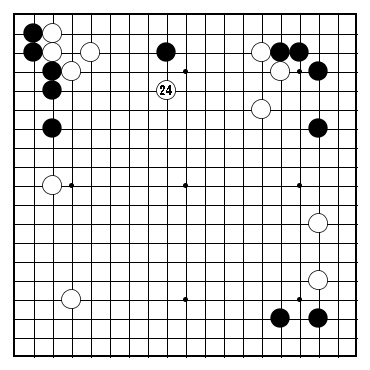
The other reason why I played Black 23 in the previous diagram was to prevent White from playing there with 24, as in diagram 4 (assumming Black extended on the upper side with 23).)
Turned out even this reason was wrong: Seokbin asked again "Do you think this exchange is good for you?" and pointed out that the 24-25 exchange in diagram 4 is not good for White, becase it's hurting White's prospects in the lower left area. So Black sholdn't worry about this anymore.
 Dia. 4
White 24 (shown in diagram 5) was an overplay according to Seokbin. How should Black respond? A bad response will turn an overplay into a good move.
 Dia. 5
In the game I responded at A in diagram 6 - but that was a mistake: White is weak in the upper left, and there is such a big gap between that White group and the White capping move, that it should be easy for Black to just separate them with 1, etc, in diagram 6.
 Dia. 6
White played a very bold move with 32 in diagram 7. This took Seokbin by surprise, it may be a bit of on overplay. Again, though, Black has to respond properly, otherwise it will turn into a very good move.
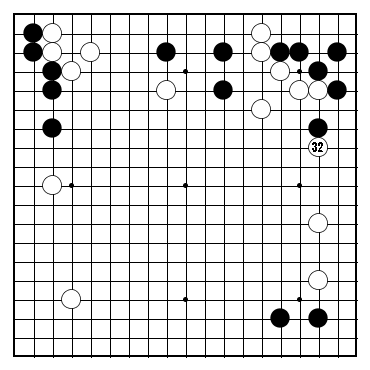 Dia. 7
In the game I retreated at 6 in diagram 8, which is too mild - and White 32 in diagram 7 turns into a nice kikashi. Black has to come up with 1 in diagram 8: this is the most severe reply. It is true that White cuts with 2 and 4, but Black lives in the corner (since A is sente), so he has nothing to worry about. Black 1 is destroying the eye shape of the White group in the upper right, while Black 7 serves as a nice attacking move.
A move like Black 1 in diagram 8 is very easy to miss since the natural instinct is to stay connected (I know I considered 1, but I must have rejected it immediately for that reason).
 Dia. 8
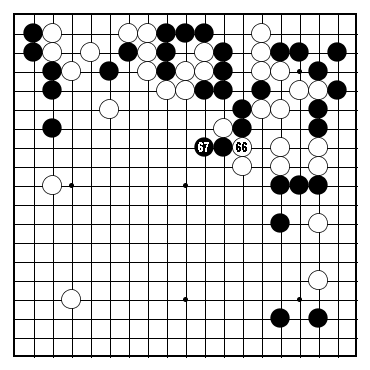
What should White play after Black played 65 as shown in diagram 9?
The position is pretty complicated because there are several weak groups involved: both Black and White have each one unsettled group on the upper side, and one each on the right side.
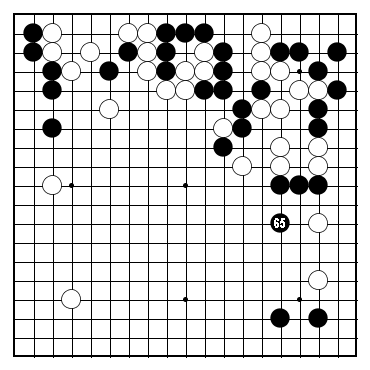 Dia. 9
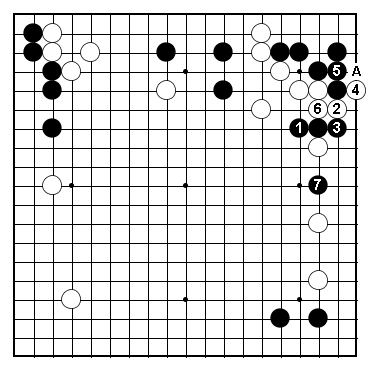
In the game White cut with 66 in diagram 10, and Black extended at 67. Seokbin questioned the value of 66, and my opponent explained that he expected Black to respond one point above 67. That made Seokbin ask: "Even so, do you think this is a good exchange for you?".
 Dia. 10
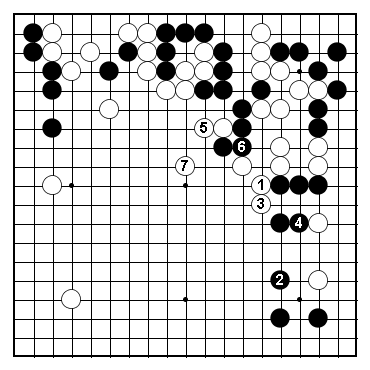
The point was that White is missing opportunities when he's forcing Black to capture one stone in diagram 10. Instead, he can aim at something similar to diagram 11: build thickness in the center with 1 and 3, then attack with 5 and 7.
Again, this kind of variation is very easy to miss, because it requires White to hurt himself first (by letting his lower-right group become very weak). This is OK though in this case, because the Black group that White is attacking is huge, and the 2 White stones in the lower right still can live locally.
 Dia. 11
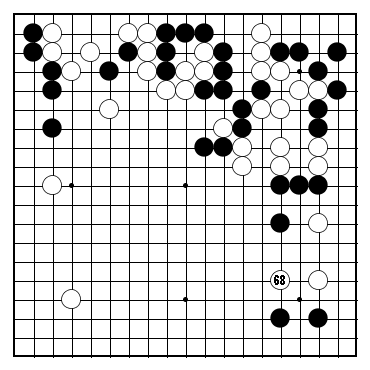
White just jumped out with 68 in diagram 12 - what should Black do next? After White's mistake at move 66, Black's group on the upper side looks almost alive - but there are still two White groups and one Black group that still haven't got definite eye shape yet.
 Dia. 12
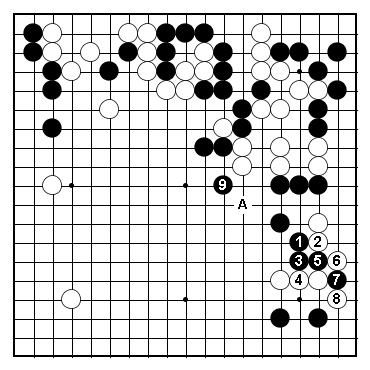
In the game Black responded with A in diagram 13, but that is the wrong direction of play, since it just invites White's weak group above to get out into the center. See moves 1 to 9 in diagram 13 for Seokbing's view of what Black should handle the situation: first build thickness on the right, then attack forcefully with 9. This is a similar technique to what he suggested for White in diagram 11.
 Dia. 13
At the point of the game shown in diagram 14 I was quite unhappy: White was very thick in the upper left, and with Black not having any significant territory I was under the impression that Black is behind. (Now that I look at that game it looks pretty balanced).
 Dia. 14
What should Black do next?
What I played in the game was the capping move at A in diagram 15, which is a very bad move: Black attacks aimlessly without having any thickness, and this cannot be good.
Seokbin showed the simple and elegant Black 1 in diagram 15 instead: Black should just defend for now, make shape while moving into the center. Black will think of attacking next, only after he's safe.
 Dia. 15
Conclusion
The title - "Do you think this exchange is good for you?" - seems to be one of Seokbin's favorite questions during game commentaries.
This is a great question to ask before every move we want to play: just consider what is the opponent's most logical response to our intended move, and ask ourselves: "Is this exchange good for me?". This may bring a new perspective on the way we play.
Complete commentary
For those interested in the actual game commentary, here it is: