Guksu - 2007
Final result: The challenger Yun Junsang (4 dan) defeated the titleholder Lee Changho: 3 - 1
Guksu (also refered to as "Kuksu" in some sources) is one of the top professional Go titles in Korea. It is an annual tournament, the previous year's title holder is playing a best-of-five match with the winner of a qualification tournament.
Everybody heard of Lee Changho, who has been the best player in the world for many years - his winning streak only recently slowed down. He is 31.
This is the first time I heard of Yun Junsang (he is the one on the left side in the picture): he is 19, and this is his first major title. Korea seems to have an unlimited pool of "new blood": new names appear very often in the top tournaments.

Game 4
Game 4 - the last one - was played on March 16th 2007 and was won by Yun Junsang by resignation in 224 moves.
Dia. 1 shows the final position of the game. If one counts the territories, it may be puzzling why Black resigned: the game looks very close. I think the reason is that Black needs to add several stones in the end to effectively capture the dead White group in the lower-left (because the Black group above that doesn't have 2 eyes, so it's a semeai that Black wins). - and those will make the final difference.
 Dia. 1
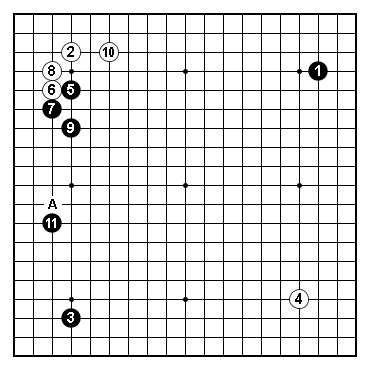
I was surprised by Black 11 early on in the fuseki - at A it looks like a better balance (at least by comparison with a Chinese fuseki). At first I thought this is a recent innovation, just to find out that I even have in my collection a professional game played in 1960 or so with the same pattern... While A would be the normal extension from the 5-7-9 group from a local point of view, Black wants to play further away from it in this case to emphasize more the lower-left corner.
 Dia. 2
Another surprise was to see that the fuseki also has a "kosumi-tsuke theme" - which is a nice coincidence, given that I recently wrote the kosumi-tsuke article. There are 2 kosumi-tsuke moves in the first 18 moves, but one is a "ghost" - see Dia. 4 for an explanation.
Look at the following diagram, which shows moves 12 to 15. Black 13 is unusual (A is the normal move). Black is playing this "stubborn" move to put more pressure on White's lower side (we also see that with Black 15, which invades right away to put Black 13 to good use).
 Dia. 3
If Black played 13 as in Dia. 4, which looks more like an expected shape, White can play a forcing move with the kosumi-tsuke at 14 before extending with 16 on the middle of the lower side. This way White's lower side is stronger compared to Dia. 3, and Black must have decided against that for this game.
 Dia. 4
Back to the game, and here is another kosumi-tsuke (this time one that materialized on the goban): after Black jumps in the center with 17 in response to White's hasami, White plays kosumi-tsuke with 18. The purpose behind this is to be a forcing move: normally Black responds at C, so White can jump into the center with A. This wouldn't be in tune with Black's plans, though: if White jumps in the center with A and so on Black's moyo on the left side will get weak and it will be easier to invade there.
So Black forces wtih 19 himself before switching fronts with 21. White can capture one stone with C next (which he did), but Black must be regarding hist stones 15 and 19 as expandable, while Black 17 served its purpose to "flatten out" White's lower side. At least that is my understanding.
 Dia. 5
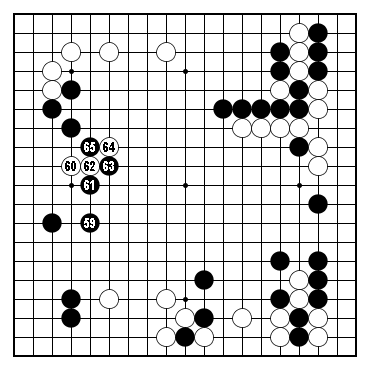
Forty moves fast forward and here is the highlight of this game: White's invasion in Black's precious left side with move 60, just after Black expanded his moyo with move 59. Black replied most aggressively, surrounding the invader with 61 to 65 in Dia. 6.
 Dia. 6
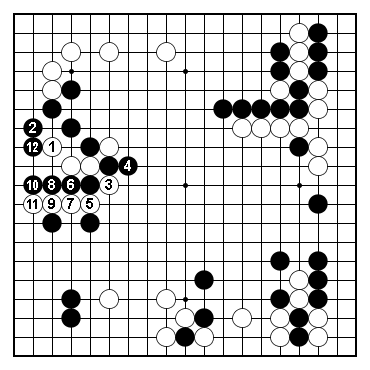
Dia. 7 shows what White can do after Black 65 - he can sacrifice his original invading stone to cut through Black's moyo. This is not the best White can do, though, so in the actual game he prepared for this by invading in the lower left first.
 Dia. 7
The actual game proceeded as in Dia. 8 and Dia.9: White invaded the lower half of Black's moyo, threatening the sequence in Dia. 7 (which he started with White 74). In order to avoid Dia. 7 - which would be much better for White with the added stones 66-68-70 - Black had to play very submissively with 75 and 77 - both on the 2nd line - while White got a ponnuki in the center. Black's compensation though is that he captured White in the lower-left.
 Dia. 8
Dia. 9 shows how White profits from sacrificing the stones in the lower-left (note the tesuji of White 96, which is a big yose move, and it is sente since it threatens to play at 97 and start a ko fight. Also, the stones White added to his dead group in the lower left set the stage for the "semedori" (forcing Black to add extra stones to capture the dead group) which in the end won the game for White.
As a side note: Black played 3 moves in a row on the second line: 75, 77 and 79!
 Dia. 9
